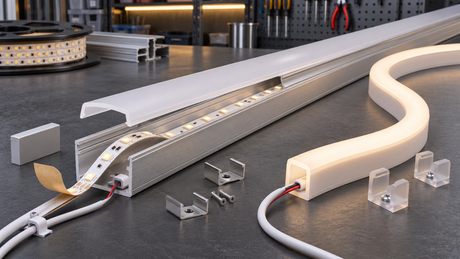
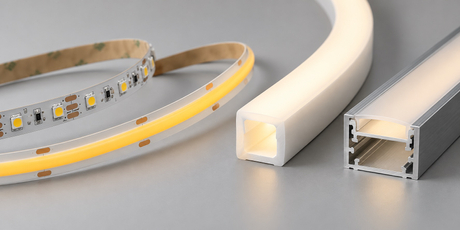
Direct answer: Choose the mounting method with the lighting source, surface, heat path, exposure and service plan in mind. Adhesive backing can suit clean, protected surfaces; clips and retainers add mechanical security; aluminum profiles help define the line and provide a controlled mounting path; silicone neon flex normally needs a matching sleeve or clip system. The right method is the one that keeps the selected LED strip or neon flex aligned, accessible and suitable for the actual installation.
This guide is for lighting designers, electrical installers, sign and display fabricators, contractors, distributors and OEM procurement teams specifying low-voltage LED strip, COB strip or silicone neon flex for commercial projects. The search intent is practical and late-funnel: buyers want to know how a product will be fixed to a cabinet, cove, sign, wall, ceiling or architectural detail before they request samples or a quotation.
It is intentionally different from a strip specification guide or a profile compatibility comparison. The focus here is the installation decision: which retention method fits the surface, geometry, environment and maintenance plan?
Adhesive-backed strip can be convenient on a clean, dry and stable surface. Remove dust, oil and loose coatings, and make sure the surface is compatible with the selected adhesive. A smooth-looking surface is not automatically a reliable bonding surface; paint, powder, wood grain and textured finishes can change the result.
Use clips, brackets or a profile when the surface is uneven, when the strip may need replacement, or when the installation must tolerate vibration or repeated access. Mechanical retention can also keep the strip in position at corners and ends where adhesive alone may not hold the intended line.
Record the substrate in the project brief. Thermal behavior, surface preparation and fixing hardware can differ between aluminum, wood, glass and painted surfaces. Test the real surface with the real strip, adhesive, clip or profile before approving a repeatable installation method.
Adhesive is fast and visually clean. It works best when the strip is supported continuously, the surface is prepared correctly and the installation conditions are controlled. Avoid stretching the strip, trapping it under sharp edges or applying it to a surface that is hot, wet, dusty or moving. Plan a service route before bonding, because removal can damage the strip or finish.
Clips provide point support and can be useful at ends, corners, transitions and locations where service access matters. Select a clip that fits the strip width and does not press on components. Space and screw placement should be checked against the visible line and the cable route.
Profiles create a defined channel, can support a diffuser and can provide a more controlled mounting and heat-spreading path when the strip and installation are suitable. Choose recessed, surface, corner or suspended geometry according to the project. Verify usable internal width, depth, lens clearance and end treatment for the exact strip.
Silicone neon flex has its own cross-section, bend direction and end treatment. Use a mounting sleeve, clip or channel designed for that body rather than treating it as a bare LED strip. Confirm retention at curves, cut positions, cable entry and service access in a representative sample.
An aluminum profile is valuable when the project needs a clean linear edge, a diffuser, a defined mounting plane or a controlled route for the strip. It is not a universal substitute for correct surface preparation or thermal design. The strip, adhesive interface, profile continuity and surrounding installation still need to work together.
For a narrow architectural line, compare the strip width and height with the profile’s usable internal dimensions, not only its advertised nominal width. For a visible cabinet or shelf, check lens clearance and viewing distance. For a cove, confirm the profile can be installed continuously and that the service route remains accessible.
Review Leomay LED strip product options and digital strip options by exact model when the installation requires a particular channel, control method or termination.
COB strip is often selected when a smoother luminous line is desired, but mounting still affects the outcome. Profile depth, diffuser distance, viewing angle and thermal contact can change the visible result. Do not assume that a COB strip will fit every narrow channel or that it eliminates the need for optical testing.
When sampling, compare the selected COB strip with the intended profile, diffuser and surface. Record the approved combination, because changing the lens or mounting depth later can change the appearance even when the strip model remains the same.
Neon flex is a shaped silicone body rather than a bare flexible circuit. Its bend direction, cross-section, cut position and end cap determine how it is retained. A top-bend product and a side-bend product can require different routing and clips. Curved signs, architectural outlines and linear accents should be sampled with the actual sleeve or clips.
Check where the cable exits, where the end is sealed or capped, and how the body can be replaced if the installation is serviced. A visually attractive curve is not enough if the mounting method pinches the silicone or blocks the intended cable route.
Fixing the light first and planning cables later often creates avoidable rework. Map the power lead, feed points, connector clearance, controller location and access panels before the profile or sleeve is closed. Confirm input voltage, polarity, total connected load and run lengths for the exact model.
For longer runs, use the voltage drop and power supply sizing guide as a design reference, then verify the selected product data. For dimming, RGB, RGBW or addressable products, review LED controller options and map the channels before fixing the wiring.
Mounting hardware does not automatically determine the ingress protection of a complete assembly. Check the strip or neon body, connectors, end caps, cable entries, profile, power-supply location and sealing method together. The LED strip IP ratings guide can help structure the questions, but the selected model and final installation requirements must be confirmed.
In damp or outdoor locations, consider drainage, condensation, fastener corrosion, cable entry and service access. Do not convert an indoor adhesive installation into an outdoor claim without testing the complete assembly for its intended exposure.
Before approving a large order, build a sample using the actual strip or neon model, substrate, adhesive or clip, profile or sleeve, diffuser, cable entry, power supply and control method. Inspect:
alignment and continuous appearance from the intended viewing distance;
retention at corners, ends and transitions;
adhesive contact and surface preparation;
thermal contact and access for maintenance;
cable routing, connector clearance and polarity;
fit after cutting, joining and end treatment.
Keep the approved cross-section, mounting drawing, sample photos and installation notes with the quotation. This prevents a visually similar component from being substituted without review.
Typical causes include contamination, textured paint, insufficient contact, stretching or unsuitable environmental conditions. Improve preparation or add mechanical retention; do not simply press the same strip back into place.
Uneven clips, a loose channel, an over-tight bend or inconsistent spacing can distort the line. Use a continuous reference edge and verify the installation before closing the diffuser.
Strip height, connector bodies, cable exits or internal clips may exceed usable clearance. Check the complete cross-section and termination parts.
Incorrect bend direction, insufficient clip spacing, a mismatched sleeve or a blocked cable exit can stress the body. Recheck the mounting method with the exact neon cross-section.
Send the supplier the application, substrate, viewing distance, strip or neon format, exact dimensions, bend direction, voltage, color or CCT, CRI, control method, run lengths, cable-entry direction, mounting method, profile or sleeve preference, exposure conditions, quantity range, drawings, sample requirements and target-market documents. If the model is not selected, ask for options to be reviewed by the complete assembly rather than by strip name alone.
No. It depends on surface preparation, movement, heat, exposure and service needs. Clips or a profile may be more appropriate.
No. The complete strip, connections, end treatment, cable entry and power-supply arrangement must be evaluated for the intended exposure.
Sometimes, but only when width, height, diffuser clearance, thermal path and wiring fit the exact models.
Only if the clip is designed for that neon body and bend direction. Confirm retention, pressure, cut position and end treatment.
Plan and test the complete assembly first. The profile, diffuser, cable route and service access should be verified before final closure.
Uneven support, bends, spacing, diffuser geometry, reflections and inconsistent surface preparation can all contribute. Inspect the full installation.
Provide drawings, substrate details, dimensions, cable routes and exposure conditions, then approve a representative sample with the real mounting components.
Send the application, substrate, strip or neon format, dimensions, voltage, control method, run lengths, profile or sleeve, exposure, quantity range and required documents.
Planning an LED strip, COB strip or silicone neon flex installation? Send Leomay the application, substrate, cross-section, dimensions, voltage, color or CCT, CRI, control method, run lengths, cable-entry direction, profile or sleeve preference, exposure conditions, quantity range, target market and required documentation. Leomay can review compatibility for the selected model and project; document availability and suitability must be confirmed for the final configuration.